Let’s Encryptをインストールしhttpsでアクセスできるようにしておきます
準備
Apacheがインストール済みであること

mod_sslをインストール
以下コマンドでmod_sslをインストールし、httpdを再起動する
yum install mod_ssl
systemctl restart httpd
念のため、導入済みであることを確認する。
以下コマンドで、mod_sslがあればOK
httpd -M | grep sslFireWall
以下コマンドで、FireWallが開通していることを確認する
firewall-cmd --list-allない場合は、以下コマンドでhttpsを追加しておく
firewall-cmd --zone=public --add-service=https --permanent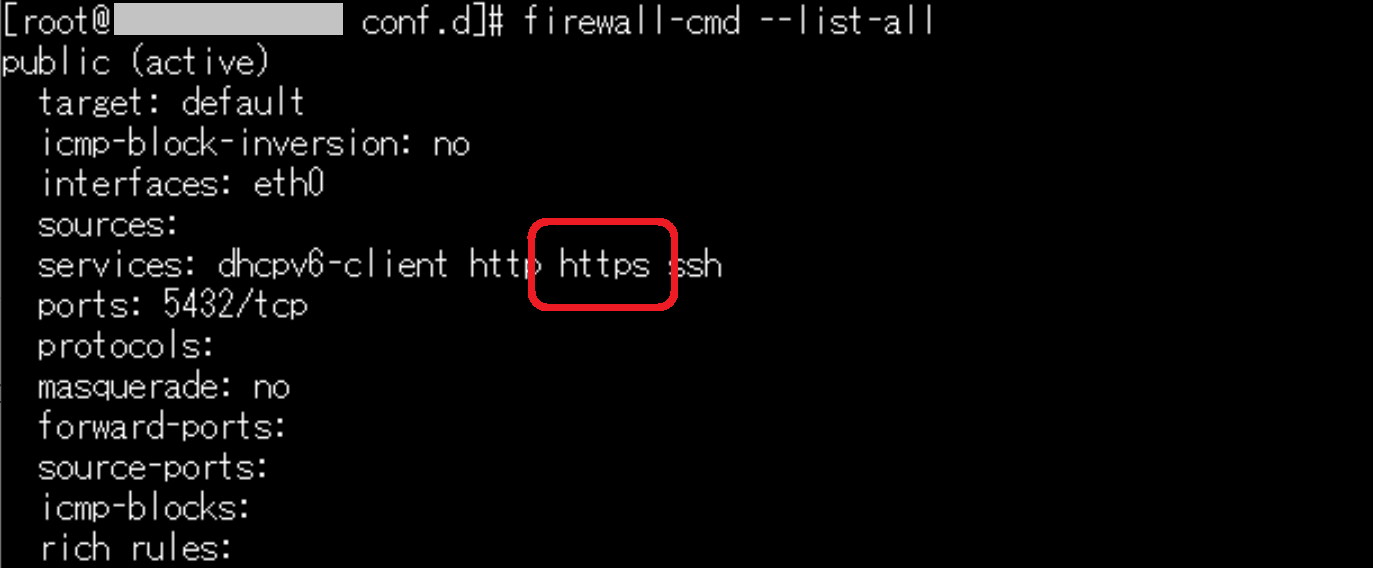
Let’s Encryptをインストール
yum install certbot python2-certbot-apacheインストールが完了したら、以下コマンドにて証明書をインストールする
certbot --apache -d xxxxxxxx※xxxxxxは自ホスト名
- Enter email address (used for urgent renewal and security notices)
- Let’s Encryptからのお知らせを受け取るアドレス
- メールアドレスを入力し、[Enter]
- Please read the Terms of Service at https://~~~~
- (Y)es/(N)o: [Y]
- (利用規約に同意する)
- Would you be willing, once your first certificate is successfully issued~~~
- (Y)es/(N)o: [N]
- (Let’s EncryptパートナーにEmailを公開する。したくない場合はNに)
以下エラーが出る場合
Unable to find a virtual host listening on port 80 which is currently needed for Certbot to prove to the CA that you control your domain. Please add a virtual host for port 80.
httpd.confに、仮想ホストを指定する必要があります。
httpd.confを開き、以下を追加してください。
NameVirtualHost *:80
<virtualHost *:80>
  ServerAdmin xxxxx
  DocumentRoot /var/www/html/
  ServerName [ホスト名]
</virtualHost>
保存したら、再度証明書インストールのコマンドを実行する
以下が表示されれば完了
Congratulations! You have successfully enabled https://xxxxxxxx確認
https://で自ホストへ接続し、鍵マークが表示されつつページが表示できればOKです。


コメント